携手创作,共同成长!这是我参与「掘金日新计划 · 8 月更文挑战」的第 1 天,点击查看活动详情
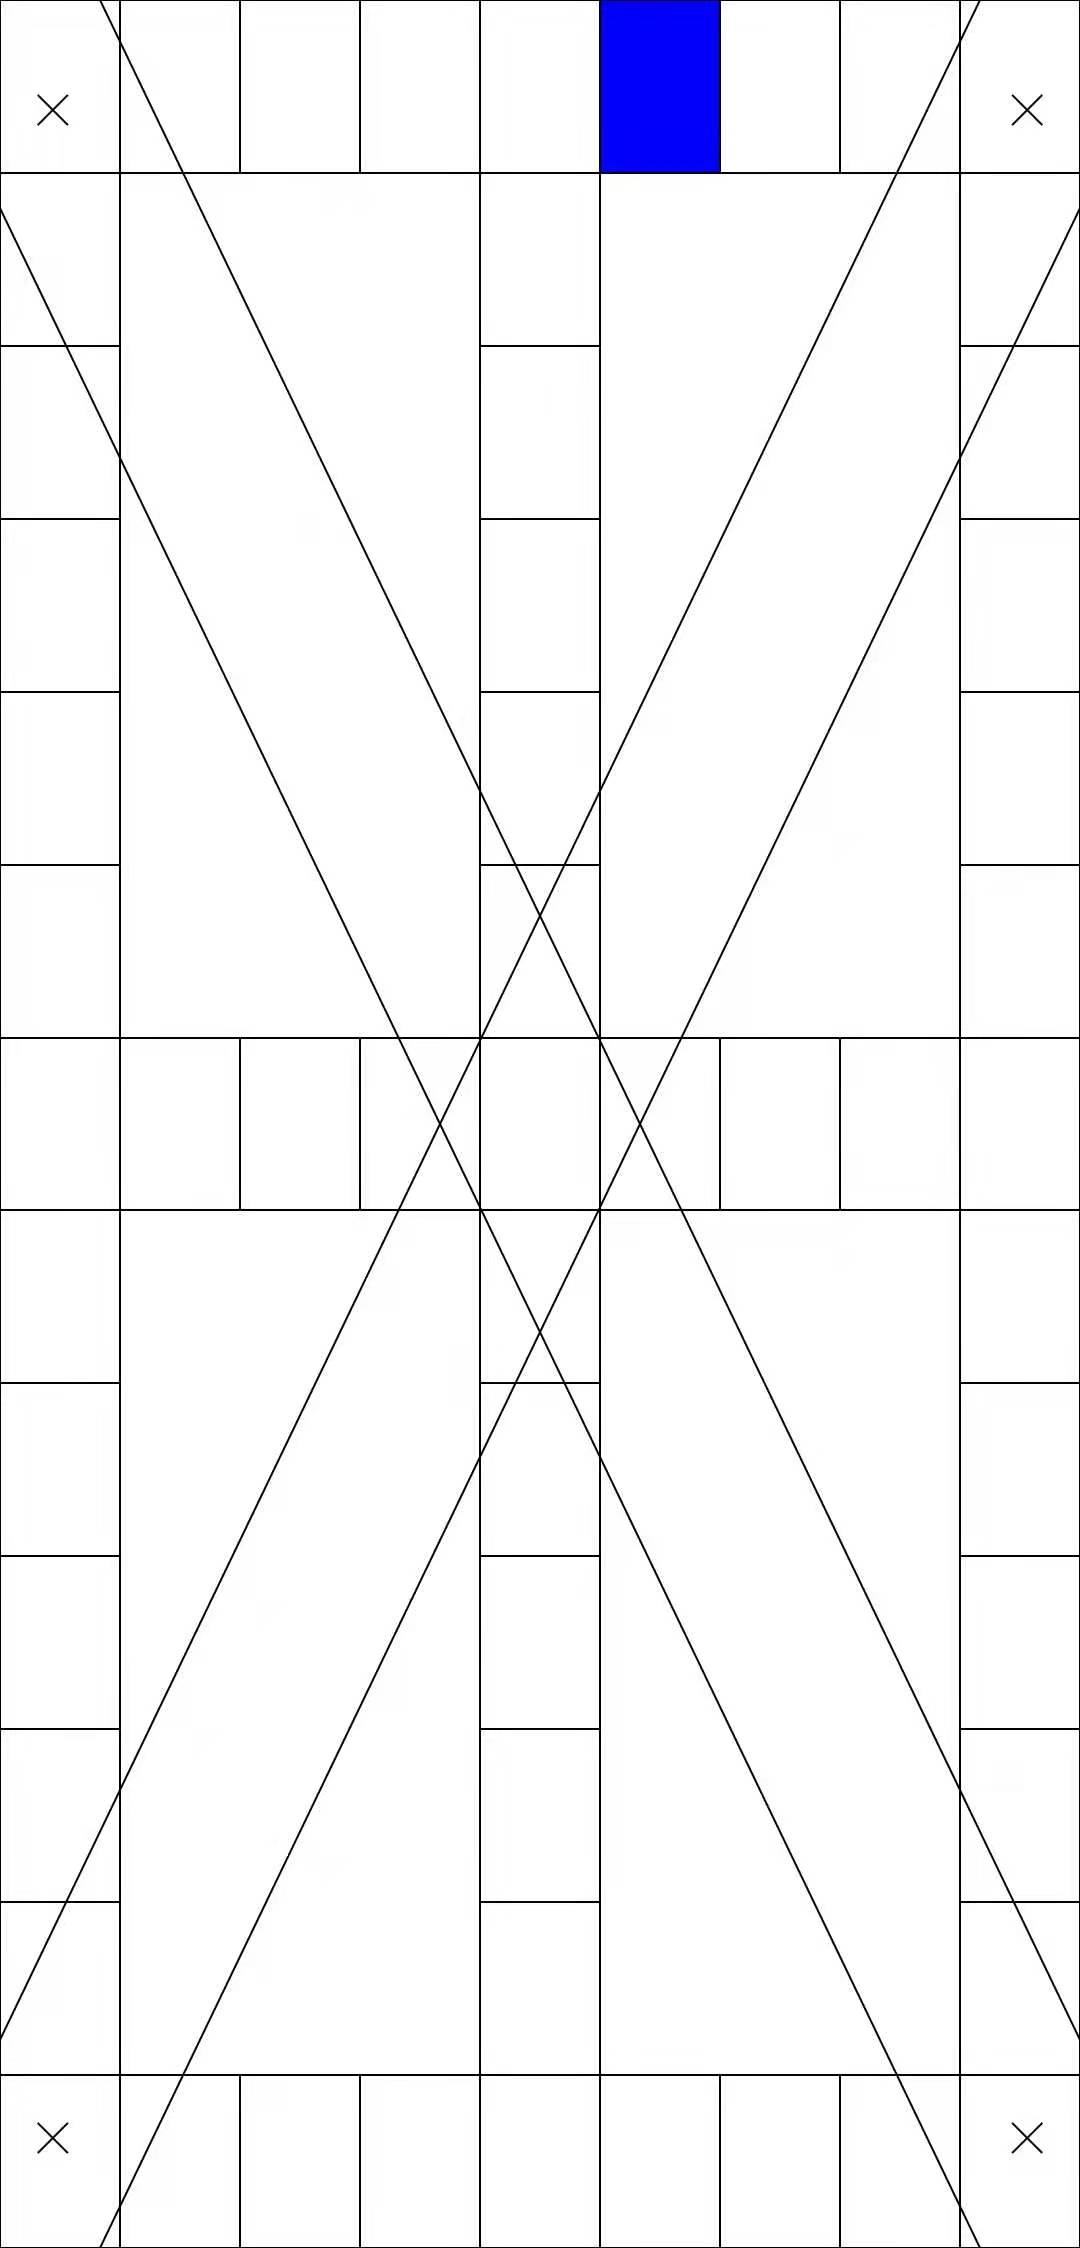
因项目需求变更,公司内的工厂测试程序重写,之前的触摸屏测试已不符合项目需求,遂对比了某米和某为的触摸屏测试效果,个人觉得某米的效果不错,虽然最后没有被采纳,但是这不妨碍我们实现一下某米的触摸屏测试。可能因机型不同,打开某米的触摸屏测试的方式也不尽相同,读者请自行百度相应机型的方式。
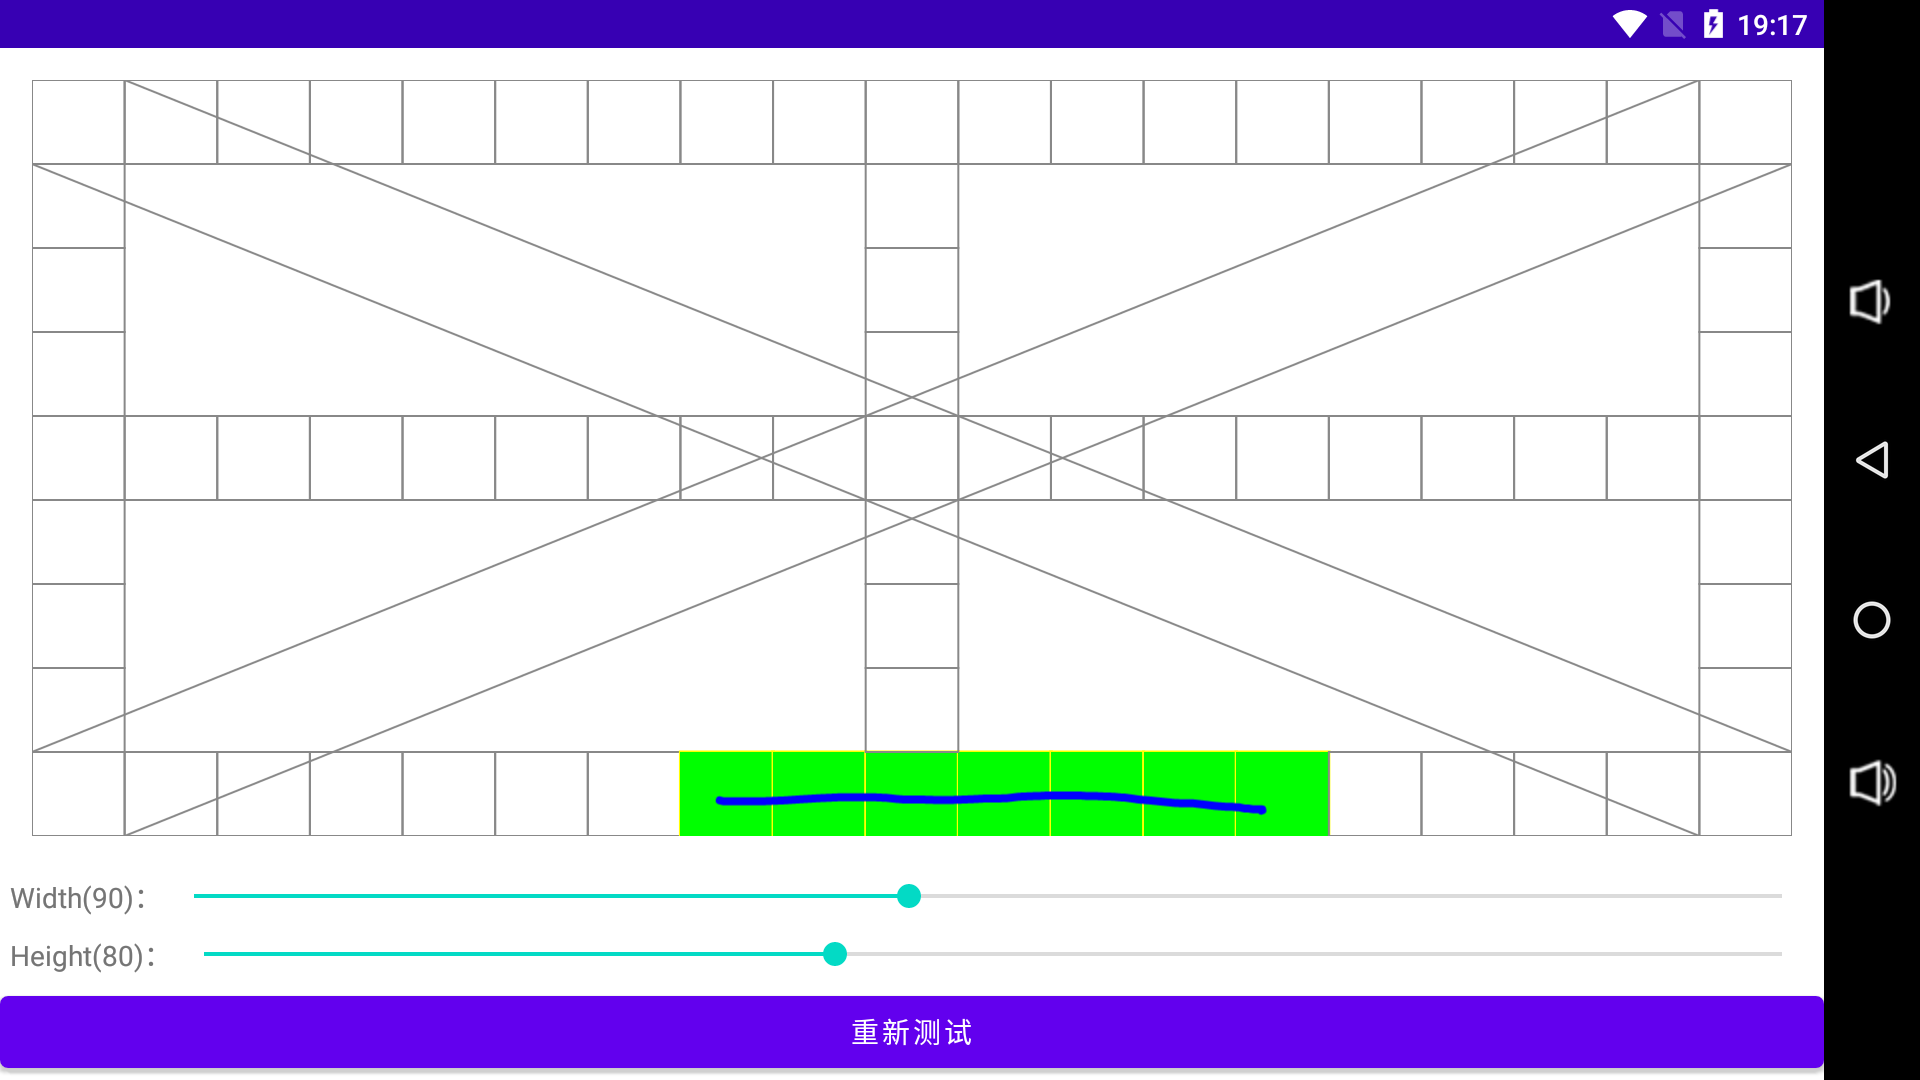
某米的触摸屏测试如上图所示,我们简单分析一下:
屏幕四周、垂直居中和水平居中有绘制单元格,触摸后会重绘颜色。
屏幕两个对角线有类似于管道的图案,此图案重绘只能从绘制 X 号的地方开始,一直到管道对端的 X 号地方为止,如果期间手指触摸超出管道的范围即失败。
手指触摸在单元格与管道内的区域滑动时,屏幕会显示滑动轨迹,如果超出区域,则轨迹消失。
所有单元格与两条管道重绘完毕则测试完成。
思路如下:以左上角的单元格为起点,计算出所有单元格的坐标保存起来,最后在 onDraw 方法中遍历单元格组,根据坐标进行绘制。
首先定义单元格的基准宽高与最终宽高变量:
1
2
3
4
5
private var itemWidthBasic = 90 private var itemHeightBasic = 80 private var itemWidth = -1F private var itemHeight = -1F
其次定义自定义 View 的宽高变量:
1
2
private var viewWidth: Int = -1 private var viewHeight: Int = -1
最后定义单元格在宽高方向上的数量变量:
1
2
private var widthCount = -1 private var heightCount = -1
定义绘制单元格的画笔:
1
2
3
4
5
6
7
private val boxPaint by lazy { Paint(Paint.ANTI_ALIAS_FLAG).apply { color = Color.GRAY style = Paint.Style.STROKE strokeWidth = 2F } }
定义 TouchRectF 实体,对 RectF 包装一层,增加 isReDrawable 变量,单元格被触摸重绘后标记为 True:
1
2
3
4
5
6
data class TouchRectF (val rectF: RectF, var isReDrawable: Boolean = false ) { fun reset () isReDrawable = false } }
定义保存单元格坐标的容器,其中包含屏幕上下左右以及垂直与水平居中的坐标容器:
1 2 3 4 5 6 7 8 9 10 11 12 13 14 15 16 17 private val leftRectFList = mutableListOf<TouchRectF>()private val topRectFList = mutableListOf<TouchRectF>()private val rightRectFList = mutableListOf<TouchRectF>()private val bottomRectFList = mutableListOf<TouchRectF>()private val centerHorizontalRectFList = mutableListOf<TouchRectF>()private val centerVerticalRectFList = mutableListOf<TouchRectF>()
选择在 onLayout 方法中计算所有单元格的坐标并获取 View 的宽高:
1
2
3
4
5
6
7
8
override fun onLayout (changed: Boolean , left: Int , top: Int , right: Int , bottom: Int ) super .onLayout(changed, left, top, right, bottom) viewWidth = width viewHeight = height computeRectF() }
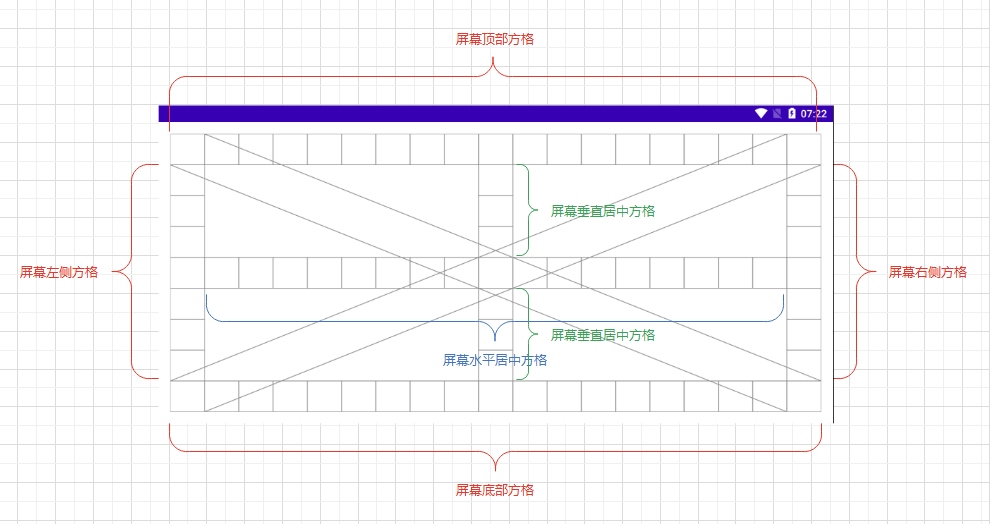
下图显示了所有单元格所在的范围:
在 computeRectF 方法中计算单元格的宽高、数量及坐标:
首先以单元格的基准宽高计算单元格宽高方向上的数量
其次以单元格宽高方向上的数量计算单元格的最终宽高
清除之前计算的结果
根据上面单元格范围示意图:
计算并保存左侧单元格的坐标,不包含头和尾,去掉与顶部和底部重叠的单元格
计算并保存顶部单元格的坐标
计算并保存右侧单元格的坐标,不包含头和尾,去掉与顶部和底部重叠的单元格
计算并保存底部单元格的坐标
计算并保存水平居中单元格的坐标,不包含头和尾,去掉与左侧和右侧重叠的单元格
计算并保存垂直居中单元格的坐标,不包含头和尾,去掉与顶部和底部重叠的单元格,且去掉与水平居中重叠的单元格
1
2
3
4
5
6
7
8
9
10
11
12
13
14
15
16
17
18
19
20
21
22
23
24
25
26
27
28
29
30
31
32
33
34
35
36
37
38
39
40
41
42
43
44
45
46
47
48
49
50
51
52
53
54
55
56
57
58
59
60
61
62
63
64
65
66
67
68
69
70
71
72
73
74
75
76
77
78
79
80
81
82
private fun computeRectF () widthCount = viewWidth / itemWidthBasic heightCount = viewHeight / itemHeightBasic itemWidth = viewWidth.toFloat() / widthCount itemHeight = viewHeight.toFloat() / heightCount leftRectFList.clear() topRectFList.clear() rightRectFList.clear() bottomRectFList.clear() centerHorizontalRectFList.clear() centerVerticalRectFList.clear() for (i in 1 until heightCount - 1 ) { val rectF = RectF(0F , itemHeight * i, itemWidth, itemHeight * (i + 1 )) leftRectFList.add(TouchRectF(rectF)) } for (i in 0 until widthCount) { val rectF = RectF(itemWidth * i, 0F , itemWidth * (i + 1 ), itemHeight) topRectFList.add(TouchRectF(rectF)) } for (i in 1 until heightCount - 1 ) { val rectF = RectF( viewWidth - itemWidth, itemHeight * i, viewWidth.toFloat(), itemHeight * (i + 1 ) ) rightRectFList.add(TouchRectF(rectF)) } for (i in 0 until widthCount) { val rectF = RectF( itemWidth * i, viewHeight - itemHeight, itemWidth * (i + 1 ), viewHeight.toFloat() ) bottomRectFList.add(TouchRectF(rectF)) } val centerHIndex = heightCount / 2 for (i in 1 until widthCount - 1 ) { val rectF = RectF( itemWidth * i, itemHeight * centerHIndex, itemWidth * (i + 1 ), itemHeight * (centerHIndex + 1 ) ) centerHorizontalRectFList.add(TouchRectF(rectF)) } val centerVIndex = widthCount / 2 val skipIndex: Int = centerHIndex for (i in 1 until heightCount - 1 ) { if (i == skipIndex) { continue } val rectF = RectF( itemWidth * centerVIndex, itemHeight * i, itemWidth * (centerVIndex + 1 ), itemHeight * (i + 1 ) ) centerVerticalRectFList.add(TouchRectF(rectF)) } }
接下来在 onDraw 中绘制单元格:
1
2
3
4
5
6
7
8
9
10
11
12
13
14
15
16
17
18
19
20
21
22
23
24
25
26
27
28
29
30
31
32
33
34
35
36
37
38
39
40
41
42
43
44
45
46
47
48
override fun onDraw (canvas: Canvas ) if (widthCount == -1 || heightCount == -1 ) { return } canvas.drawColor(Color.BLACK, PorterDuff.Mode.CLEAR) canvas.drawColor(Color.WHITE) drawHorizontalBox(canvas) drawVerticalBox(canvas) } private fun drawHorizontalBox (canvas: Canvas ) for (rectF in topRectFList) { drawBox(rectF, canvas) } for (rectF in centerHorizontalRectFList) { drawBox(rectF, canvas) } for (rectF in bottomRectFList) { drawBox(rectF, canvas) } } private fun drawVerticalBox (canvas: Canvas ) for (rectF in leftRectFList) { drawBox(rectF, canvas) } for (rectF in centerVerticalRectFList) { drawBox(rectF, canvas) } for (rectF in rightRectFList) { drawBox(rectF, canvas) } } private fun drawBox (rectF: TouchRectF , canvas: Canvas ) canvas.drawRect(rectF.rectF, boxPaint) }
首先做参数校验与画布清空
然后绘制水平方向的单元格,在 drawHorizontalBox 方法中遍历水平方向的单元格坐标容器,再调用 drawBox 方法传入坐标绘制单元格
最后绘制垂直方向的单元格,在 drawVerticalBox 方法中遍历垂直方向的单元格坐标容器,再调用 drawBox 方法传入坐标绘制单元格
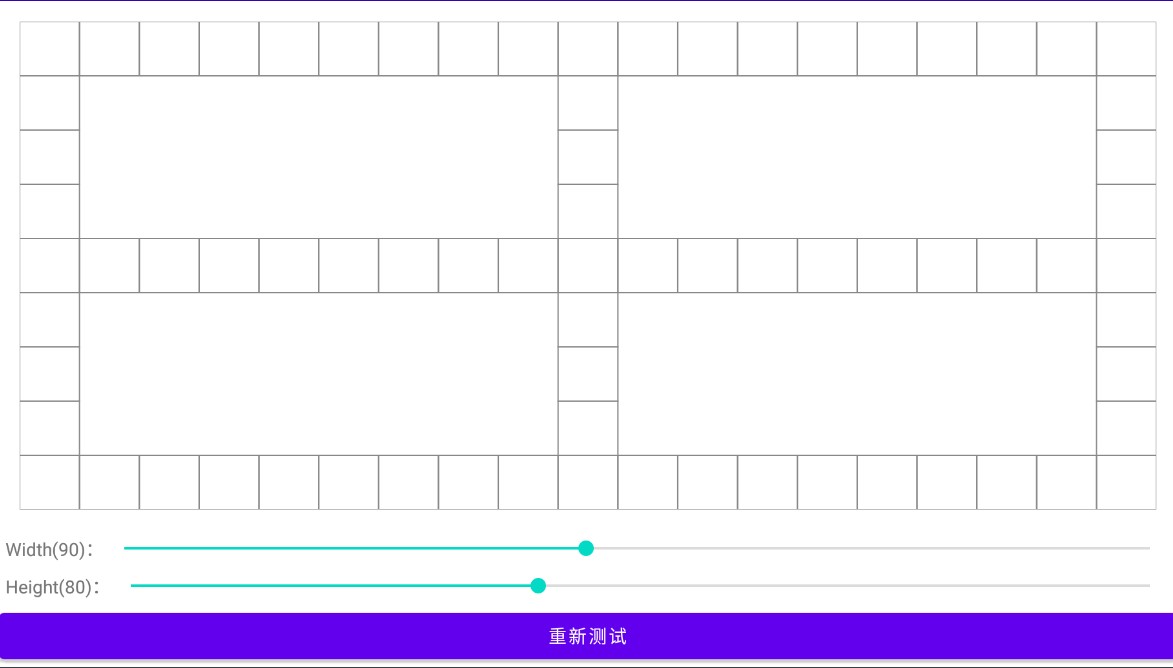
在 drawBox 方法中绘制单元格
效果如下:
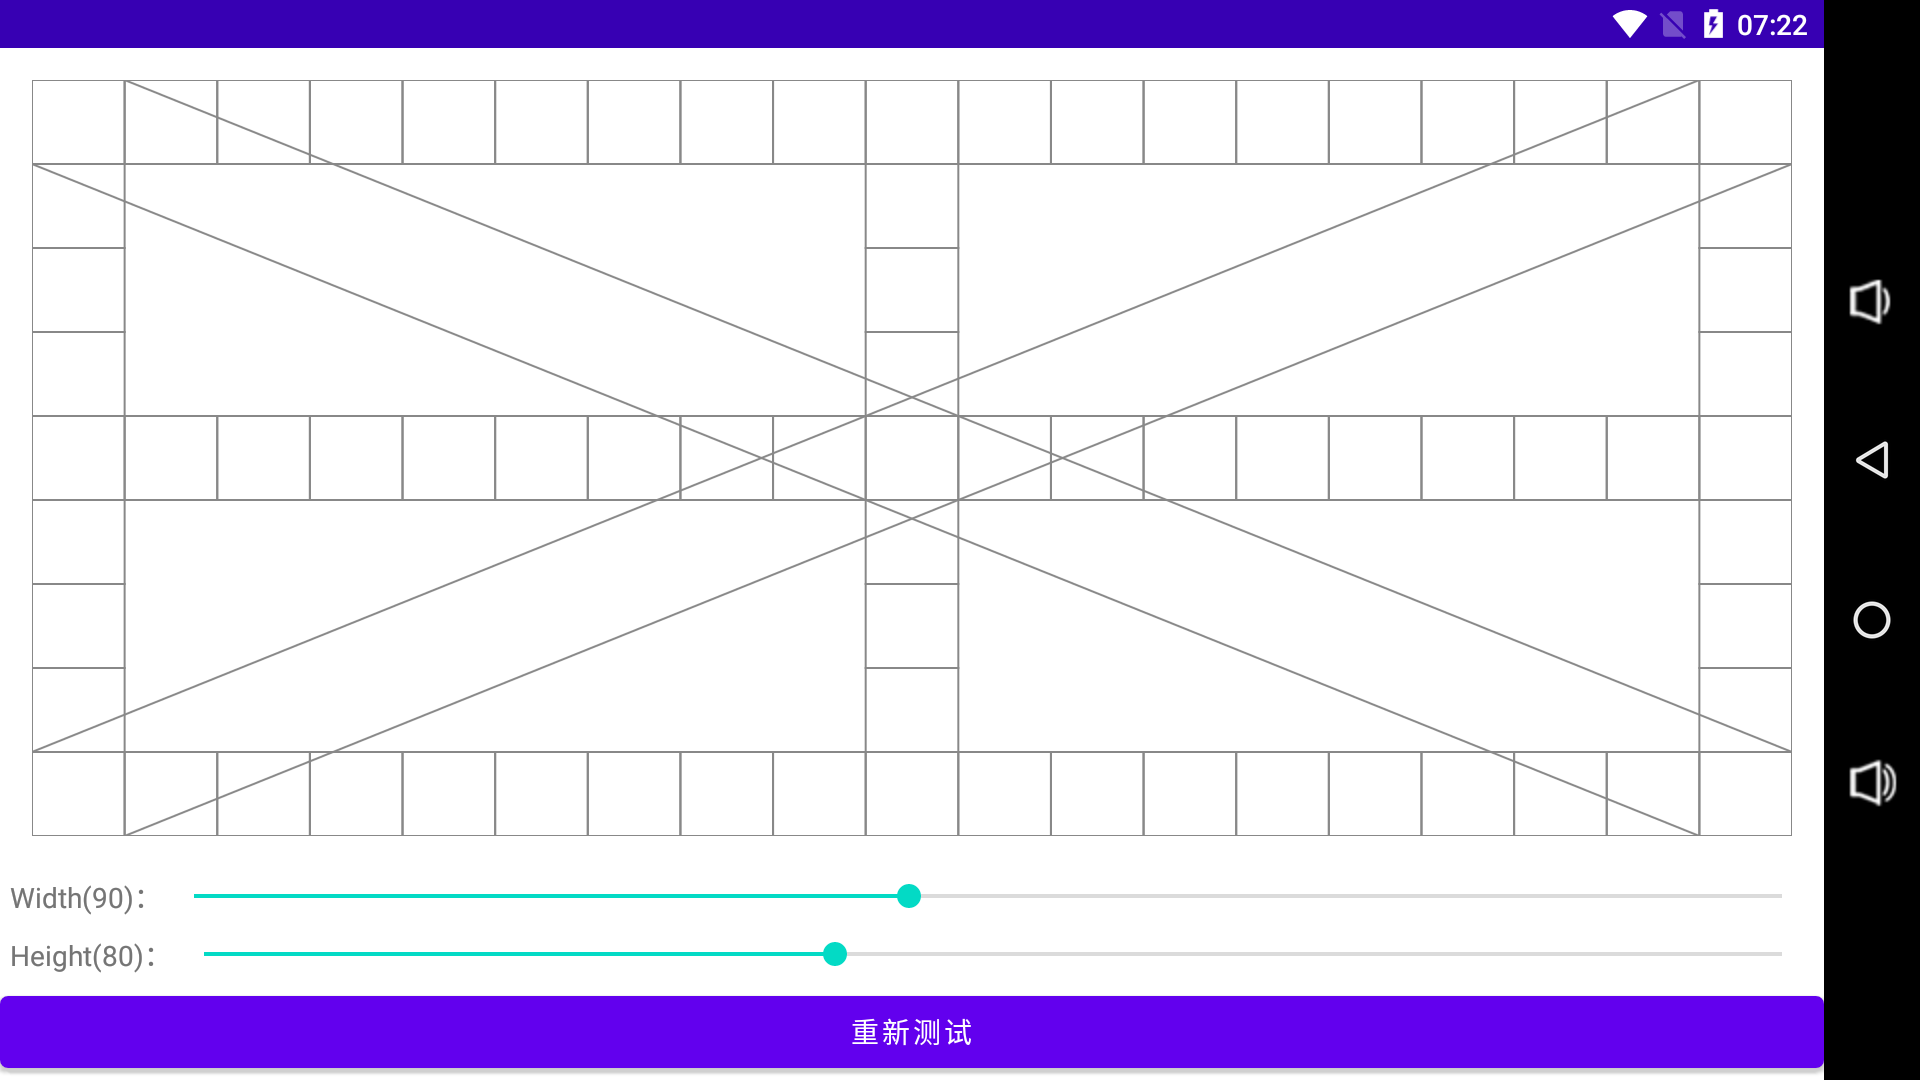
上面绘制单元格比较简单一些,现在要绘制的两个管道相对复杂一些,本文为了简单,没有完全仿照某米触摸屏测试中管道的 UI 效果。
思路:通过 Path 连接对角两个单元格的顶点组成管道,由于 Path 闭合后,单元格的两个顶点会连接成直线,这里两个顶点的连接使用二阶贝赛尔曲线绘制一个 View 显示范围之外的弧线,这样看起来管道没有起止点,且 Path 也可以闭合,同时也方便判断触摸点是否在管道内。
定义管道 Path 和 Region:
1 2 3 4 5 6 7 8 9 10 11 private val positiveCrossPath = TouchPath()private val positiveCrossRegion = Region()private val reverseCrossPath = TouchPath()private val reverseCrossRegion = Region()
在 computeRectF 方法中计算管道 Path 路径:
重置 Path 路径
计算正向管道 Path,以左下角单元格为起点,右上角单元格为终点绘制 Path。
计算反向管道 Path,以左上角单元格为起点,右下角单元格为终点绘制 Path。
下面代码中的注释说明的更多一些。
1
2
3
4
5
6
7
8
9
10
11
12
13
14
15
16
17
18
19
20
21
22
23
24
25
26
27
28
29
30
31
32
33
34
35
36
37
38
39
40
41
42
43
44
45
46
47
48
49
50
51
52
53
54
55
56
57
58
59
60
61
62
63
64
65
66
67
68
69
70
71
72
73
74
75
76
77
78
79
80
81
82
83
84
85
86
87
88
89
90
91
92
93
94
private fun computeRectF () positiveCrossPath.path.reset() reverseCrossPath.path.reset() val lbRectF = bottomRectFList.first().rectF val rtRectF = topRectFList.last().rectF with(positiveCrossPath.path) { moveTo(lbRectF.left, lbRectF.top) lineTo(rtRectF.left, rtRectF.top) quadTo( rtRectF.right + itemWidth, rtRectF.top - itemHeight, rtRectF.right, rtRectF.bottom ) lineTo(lbRectF.right, lbRectF.bottom) quadTo( lbRectF.left - itemWidth, lbRectF.bottom + itemHeight, lbRectF.left, lbRectF.top ) close() } val positiveCrossRectF = RectF() positiveCrossPath.path.computeBounds(positiveCrossRectF, true ) positiveCrossRegion.setPath(positiveCrossPath.path, positiveCrossRectF.toRegion()) val ltRectF = topRectFList.first().rectF val rbRectF = bottomRectFList.last().rectF with(reverseCrossPath.path) { moveTo(ltRectF.right, ltRectF.top) lineTo(rbRectF.right, rbRectF.top) quadTo( rbRectF.right + itemWidth, rbRectF.bottom + itemHeight, rbRectF.left, rbRectF.bottom ) lineTo(ltRectF.left, ltRectF.bottom) quadTo( ltRectF.left - itemWidth, ltRectF.top - itemHeight, ltRectF.right, ltRectF.top ) close() } val reverseCrossRectF = RectF() reverseCrossPath.path.computeBounds(reverseCrossRectF, true ) reverseCrossRegion.setPath(reverseCrossPath.path, reverseCrossRectF.toRegion()) }
接下来在 onDraw 方法中绘制管道:
1
2
3
4
5
6
7
8
9
10
11
12
13
14
override fun onDraw (canvas: Canvas ) drawPositiveCross(canvas) drawReverseCross(canvas) } private fun drawReverseCross (canvas: Canvas ) canvas.drawPath(reverseCrossPath.path, boxPaint) } private fun drawPositiveCross (canvas: Canvas ) canvas.drawPath(positiveCrossPath.path, boxPaint) }
效果如下:
单元格与管道已经绘制好了,下面我们先开始重绘单元格。
大体思路:在手指触摸屏幕的时候判断当前触摸的屏幕坐标是否在单元格内,是的话则重绘,否则不重绘。
首先定义重绘单元格的画笔:
1
2
3
4
5
6
private val fillPaint by lazy { Paint(Paint.ANTI_ALIAS_FLAG).apply { color = Color.GREEN style = Paint.Style.FILL } }
因为单元格与单元格、单元格与管道之间有重叠的部分,突出显示重叠部分哪块单元格没有被重绘,重绘单元格时改变单元格边框的颜色,所以需要定义重绘单元格的画笔:
1
2
3
4
5
6
7
private val redrawBoxPaint by lazy { Paint(Paint.ANTI_ALIAS_FLAG).apply { color = Color.YELLOW style = Paint.Style.STROKE strokeWidth = 3F } }
我们重写 onTouchEvent 方法,在此方法中处理触摸事件:
1
2
3
4
5
6
7
8
9
10
11
12
13
14
15
16
17
18
19
20
21
22
23
24
25
26
27
28
29
30
31
32
33
34
35
36
override fun onTouchEvent (event: MotionEvent ) Boolean { val x = event.x val y = event.y when (event.actionMasked) { MotionEvent.ACTION_DOWN -> { findReDrawableBox(x, y) invalidate() } } return true } private fun findReDrawableBox (x: Float , y: Float ) val touchRectF = (leftRectFList.find { it.rectF.contains(x, y) } ?: topRectFList.find { it.rectF.contains(x, y) } ?: rightRectFList.find { it.rectF.contains(x, y) } ?: bottomRectFList.find { it.rectF.contains(x, y) } ?: centerHorizontalRectFList.find { it.rectF.contains(x, y) } ?: centerVerticalRectFList.find { it.rectF.contains(x, y) }) if (touchRectF != null ) { markBoxReDrawable(touchRectF) } } private fun markBoxReDrawable (rectF: TouchRectF ) if (!rectF.isReDrawable) { rectF.isReDrawable = true } }
在 onTouchEvent 方法中,我们监听 ACTION_DOWN 事件,根据当前触摸屏幕的坐标查找可重绘的单元格,如果查找到匹配的单元格且此单元格目前还没有被重绘,则标记此单元格为可重绘的。
接下来,我们重构绘制单元格的 drawBox 方法来重绘单元格:
1 2 3 4 5 6 7 8 9 10 11 private fun drawBox (rectF: TouchRectF , canvas: Canvas ) if (rectF.isReDrawable) { canvas.drawRect(rectF.rectF, redrawBoxPaint) canvas.drawRect(rectF.rectF, fillPaint) } else { canvas.drawRect(rectF.rectF, boxPaint) } }
一个个方格点击不太现实,因此增加手指滑动重绘单元格,同时增加手指滑动轨迹线绘制。
定义轨迹线 Path:
1 private val linePath = Path()
定义轨迹线画笔:
1
2
3
4
5
6
7
8
9
private val linePaint by lazy { Paint(Paint.ANTI_ALIAS_FLAG).apply { color = Color.BLUE style = Paint.Style.STROKE strokeWidth = 8F strokeJoin = Paint.Join.ROUND strokeCap = Paint.Cap.ROUND } }
接下来,需要修改 onTouchEvent 方法增加对滑动重绘单元格和绘制轨迹线的支持:
1
2
3
4
5
6
7
8
9
10
11
12
13
14
15
16
17
18
19
20
21
22
23
24
25
26
27
28
29
30
31
32
33
34
35
36
37
38
39
40
41
42
43
44
45
46
47
48
49
50
51
52
53
54
55
56
override fun onTouchEvent (event: MotionEvent ) Boolean { val x = event.x val y = event.y when (event.actionMasked) { MotionEvent.ACTION_DOWN -> { linePath.reset() linePath.moveTo(x, y) findReDrawableBox(x, y) } MotionEvent.ACTION_MOVE -> { if (isInTouchableRegion(x, y)) { if (linePath.isEmpty) { linePath.moveTo(x, y) } else { linePath.lineTo(x, y) } findReDrawableBox(x, y) } else { linePath.reset() } invalidate() } MotionEvent.ACTION_UP, MotionEvent.ACTION_CANCEL -> { linePath.reset() invalidate() } } return true } private fun isInTouchableRegion (x: Float , y: Float ) Boolean { return leftRectFList.any { it.rectF.contains(x, y) } || topRectFList.any { it.rectF.contains(x, y) } || rightRectFList.any { it.rectF.contains(x, y) } || bottomRectFList.any { it.rectF.contains(x, y) } || centerHorizontalRectFList.any { it.rectF.contains(x, y) } || centerVerticalRectFList.any { it.rectF.contains(x, y) } || positiveCrossRegion.contains(x.toInt(), y.toInt()) || reverseCrossRegion.contains(x.toInt(), y.toInt())
首先在 ACTION_DOWN 中清空轨迹线 Path,并移动轨迹线起点至当前坐标。
然后在 ACTION_MOVE 中先判断当前坐标是否在单元格和管道区域内,如果不在区域内,不绘制轨迹线,则重置轨迹线 Path;否则再判断轨迹线 Path 是否为空,为空认为已经被重置,先移动轨迹线起点至当前坐标,否则认为没有被重置,连接直线至当前坐标;最后重绘 View。
接下来修改 onDraw 方格,增加轨迹线的绘制:
1
2
3
4
5
6
7
8
9
10
11
12
13
14
15
16
17
override fun onDraw (canvas: Canvas ) drawTrackLine(canvas) } private fun drawTrackLine (canvas: Canvas ) if (linePath.isEmpty) { return } canvas.drawPath(linePath, linePaint) }
效果如下:
在某米的触摸屏测试中,笔者发现有以下几个条件需要注意:
如果滑动期间超出管道的范围认为无效。
只能从管道一端开始触摸,即从管道中间触摸视为无效。
如果从管道一端开始,不是通过管道到达另一端认为无效,即开始时是从管道一端开始,期间通过沿单元格滑动到达另一端。
以上几个问题中,第一个问题上面绘制轨迹线时已经解决,下面我们解决其他几个问题。
解决思路:
问题2:判断轨迹线的起点坐标是否在四个顶点单元格区域内。
问题3:判断轨迹线上所有点的坐标是否在管道区域内。
首先定义 PathMeasure 变量,用于获取轨迹线 Path 上各点的坐标:
1 private val linePathMeasure = PathMeasure()
在 onTouchEvent 方法中的 ACTION_MOVE 分支中增加 findReDrawableCross 重绘管道逻辑:
1
2
3
4
5
6
7
8
9
10
11
12
13
14
15
16
17
18
19
override fun onTouchEvent (event: MotionEvent ) Boolean { when (event.actionMasked) { MotionEvent.ACTION_MOVE -> { if (isInTouchableRegion(x, y)) { findReDrawableBox(x, y) findReDrawableCross() } } } return true }
findReDrawableCross 方法代码较多且稍微复杂一些,下面我把代码拆开逐步分析。
首先校验轨迹线 Path 是否为空,为空则返回。
把轨迹线 Path 设置给路径测量器。
获取轨迹线 Path 的起点与终点的坐标并校验坐标合法性。
1
2
3
4
5
6
7
8
9
10
11
12
13
14
15
16
17
18
19
20
21
22
23
24
25
26
27
28
29
30
31
32
33
34
private fun findReDrawableCross () if (linePath.isEmpty) { return } linePathMeasure.setPath(linePath, false ) val startPoint = FloatArray(2 ) val endPoint = FloatArray(2 ) val linePathLength = linePathMeasure.length linePathMeasure.getPosTan(0F , startPoint, null ) linePathMeasure.getPosTan(linePathLength, endPoint, null ) val startX = startPoint[0 ] val startY = startPoint[1 ] if (startX == 0F || startY == 0F ) { return } val endX = endPoint[0 ] val endY = endPoint[1 ] if (endX == 0F || endY == 0F ) { return } }
获取正向管道两端的单元格。
判断轨迹线的起点与终点坐标是否都在管道两端的单元格区域内。
遍历轨迹线,判断轨迹线上点的坐标是否在管道区域内。
标记正向管道可重绘。
1
2
3
4
5
6
7
8
9
10
11
12
13
14
15
16
17
18
19
20
21
22
23
24
25
26
27
28
29
30
31
32
33
34
35
36
37
38
39
40
41
42
43
44
45
46
47
48
49
50
51
52
53
private fun findReDrawableCross () val lbRectF = bottomRectFList.first().rectF val rtRectF = topRectFList.last().rectF if (((lbRectF.contains(startX, startY) && rtRectF.contains(endX, endY)) || (lbRectF.contains(endX, endY) && rtRectF.contains(startX, startY))) ) { var mark = true for (i in 1 until linePathLength.toInt()) { val point = FloatArray(2 ) val posTan = linePathMeasure.getPosTan(i.toFloat(), point, null ) if (!posTan) { mark = false break } val x = point[0 ] val y = point[1 ] if (x == 0F || y == 0F ) { mark = false break } if (!positiveCrossRegion.contains(x.toInt(), y.toInt())) { mark = false break } } if (mark) { markPositiveCrossReDrawable() } } } private fun markPositiveCrossReDrawable () if (!positiveCrossPath.isReDrawable) { positiveCrossPath.isReDrawable = true } }
反向管道的重绘逻辑与正向管道相同:
获取反向管道两端的单元格。
判断轨迹线的起点与终点坐标是否都在管道两端的单元格区域内。
遍历轨迹线,判断轨迹线上点的坐标是否在管道区域内。
标记反向管道可重绘。
1
2
3
4
5
6
7
8
9
10
11
12
13
14
15
16
17
18
19
20
21
22
23
24
25
26
27
28
29
30
31
32
33
34
35
36
37
38
39
40
41
42
43
44
45
46
47
48
49
50
51
52
53
private fun findReDrawableCross () val ltRectF = topRectFList.first().rectF val rbRectF = bottomRectFList.last().rectF if (((ltRectF.contains(startX, startY) && rbRectF.contains(endX, endY)) || (ltRectF.contains(endX, endY) && rbRectF.contains(startX, startY))) ) { var mark = true for (i in 1 until linePathLength.toInt()) { val point = FloatArray(2 ) val posTan = linePathMeasure.getPosTan(i.toFloat(), point, null ) if (!posTan) { mark = false break } val x = point[0 ] val y = point[1 ] if (x == 0F || y == 0F ) { mark = false break } if (!reverseCrossRegion.contains(x.toInt(), y.toInt())) { mark = false break } } if (mark) { markReverseCrossReDrawable() } } } private fun markReverseCrossReDrawable () if (!reverseCrossPath.isReDrawable) { reverseCrossPath.isReDrawable = true } }
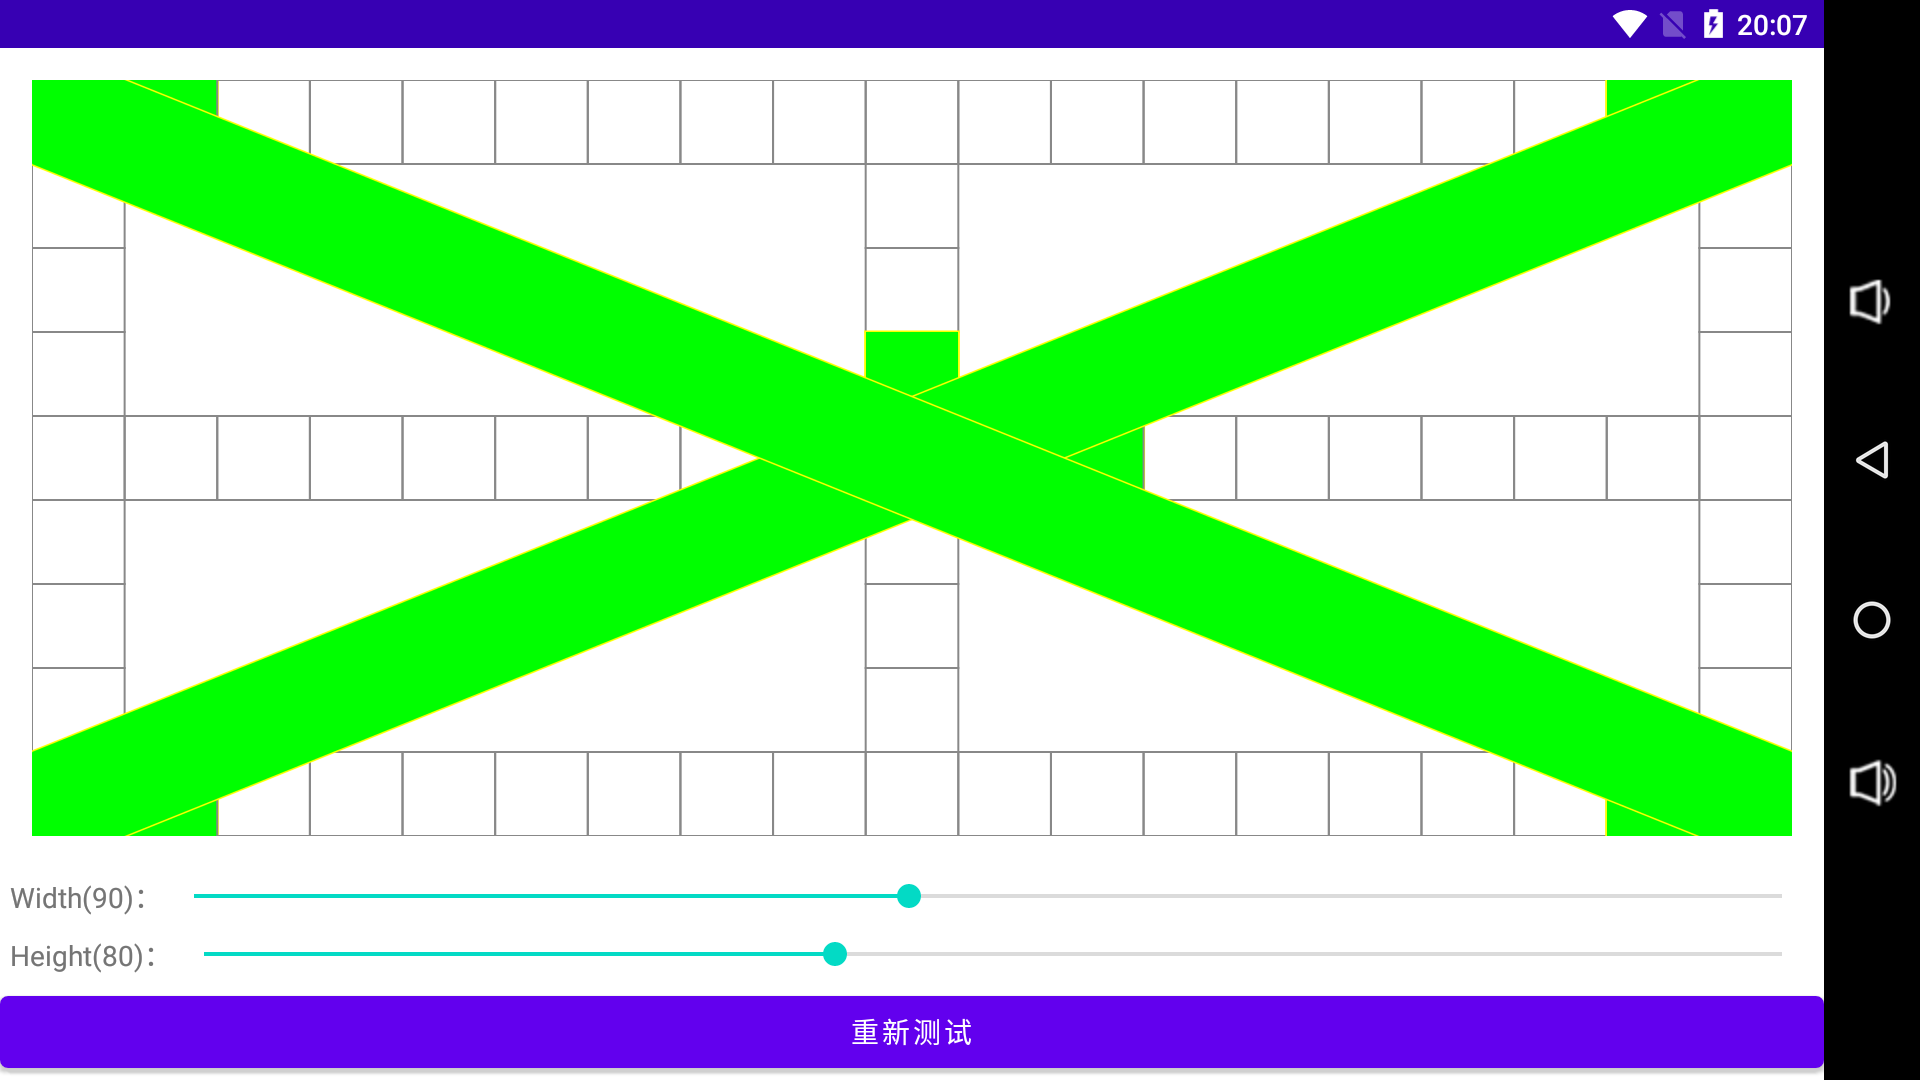
重绘交叉管道的效果如下:
最后我们还剩下触摸屏测试完成的判断以及对外提供测试完成的回调,并且测试完成后不再绘制轨迹线。
定义测试完成的回调:
1
2
3
4
interface TouchPassListener { fun onTouchPass () }
定义是否测试完成变量与测试完成回调变量:
1
2
3
private var isPassed = false private var mTouchPassListener: TouchPassListener? = null
新增 isTouchPass 方法,在此方法中判断所有单元格和管道是否都被标记为可重绘的:
1
2
3
4
5
6
7
8
9
10
private fun isTouchPass () Boolean { return leftRectFList.all { it.isReDrawable } && topRectFList.all { it.isReDrawable } && rightRectFList.all { it.isReDrawable } && bottomRectFList.all { it.isReDrawable } && centerHorizontalRectFList.all { it.isReDrawable } && centerVerticalRectFList.all { it.isReDrawable } && positiveCrossPath.isReDrawable && reverseCrossPath.isReDrawable }
然后在标记单元格和管道为可重绘的方法中调用 isTouchPass 方法即可:
1
2
3
4
5
6
7
8
9
10
11
12
13
14
15
16
17
18
19
20
21
22
23
24
25
26
27
28
29
30
31
32
33
34
private fun markBoxReDrawable (rectF: TouchRectF ) if (!rectF.isReDrawable) { rectF.isReDrawable = true if (isTouchPass()) { touchPass() } } } private fun markPositiveCrossReDrawable () if (!positiveCrossPath.isReDrawable) { positiveCrossPath.isReDrawable = true if (isTouchPass()) { touchPass() } } } private fun markReverseCrossReDrawable () if (!reverseCrossPath.isReDrawable) { reverseCrossPath.isReDrawable = true if (isTouchPass()) { touchPass() } } } private fun touchPass () isPassed = true mTouchPassListener?.onTouchPass() }
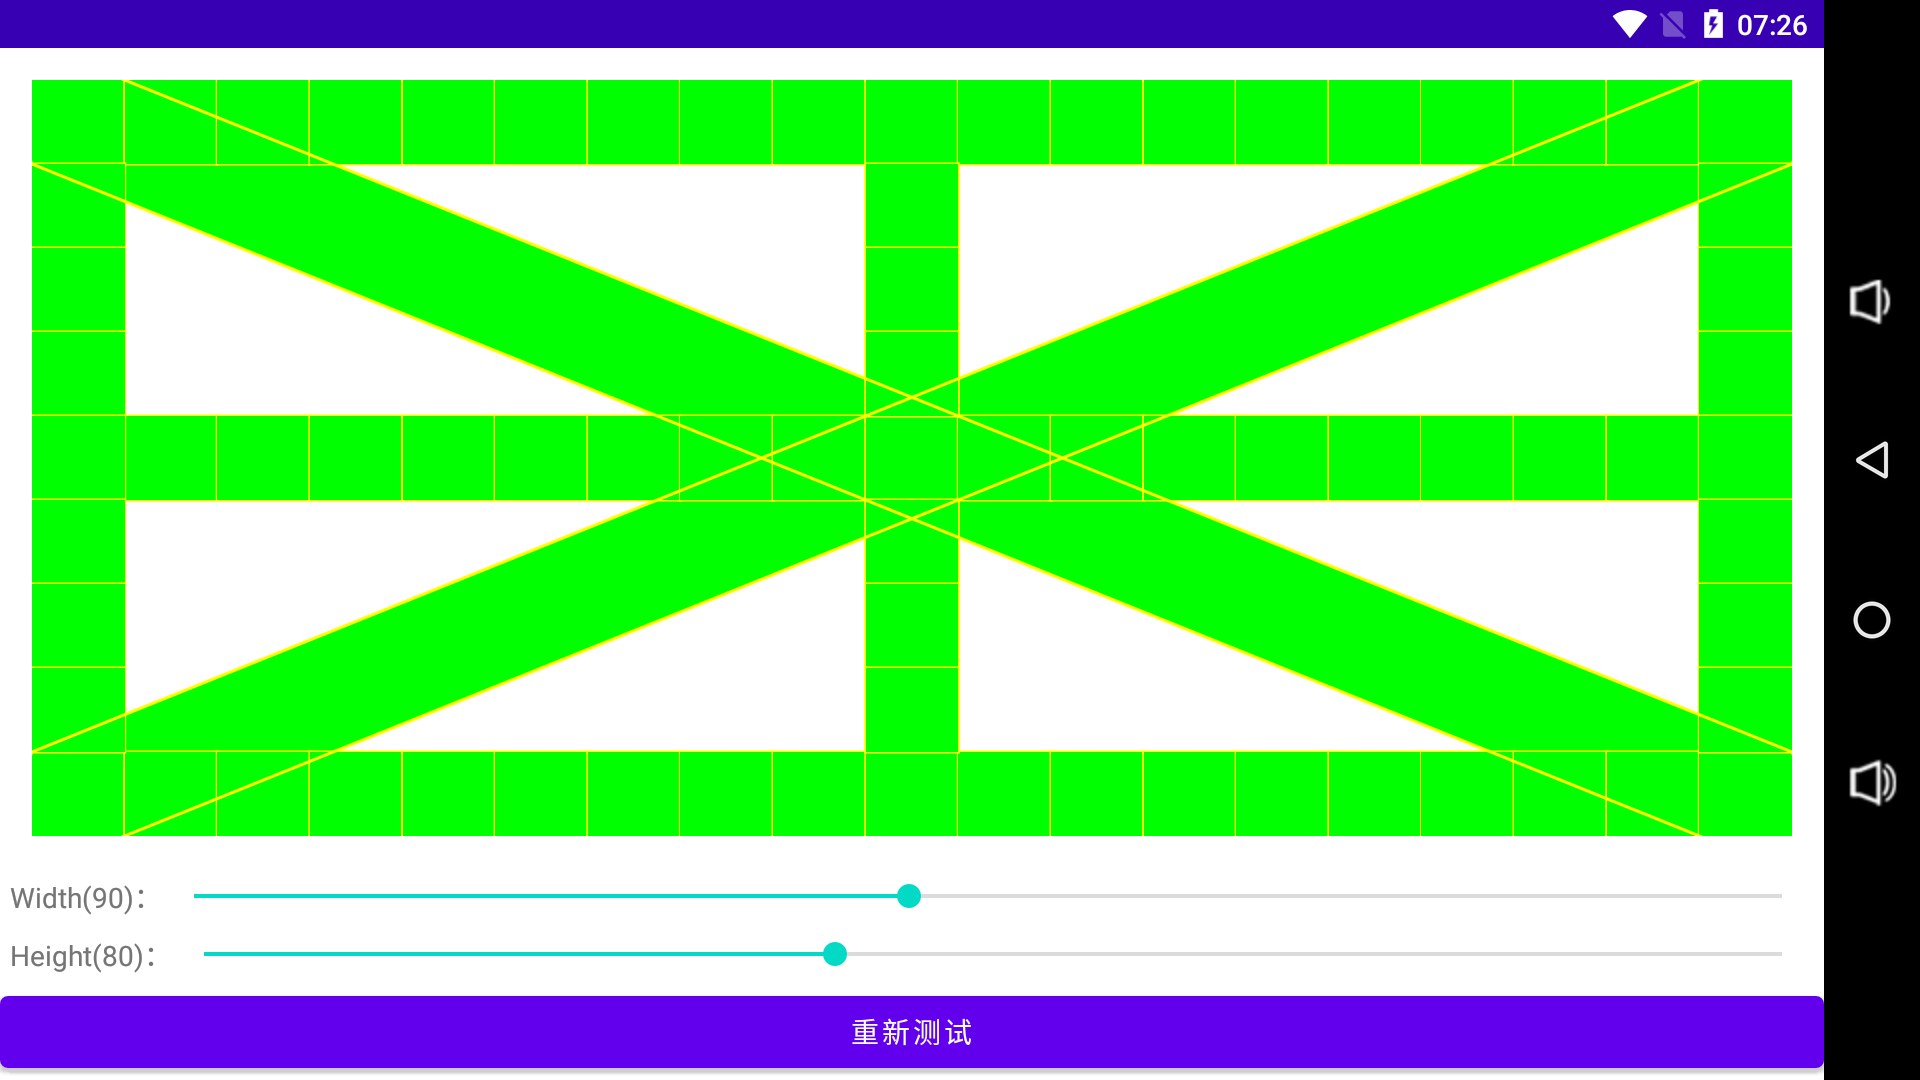
最后效果如下:
